Horse lunging is an important training technique used to exercise and work with horses in a controlled environment. It allows the horse to move in a circular pattern around the handler, promoting physical conditioning, balance, and obedience. Understanding the basics of horse lunging is crucial for both experienced equestrians and beginners looking to develop a strong foundation in horse training.
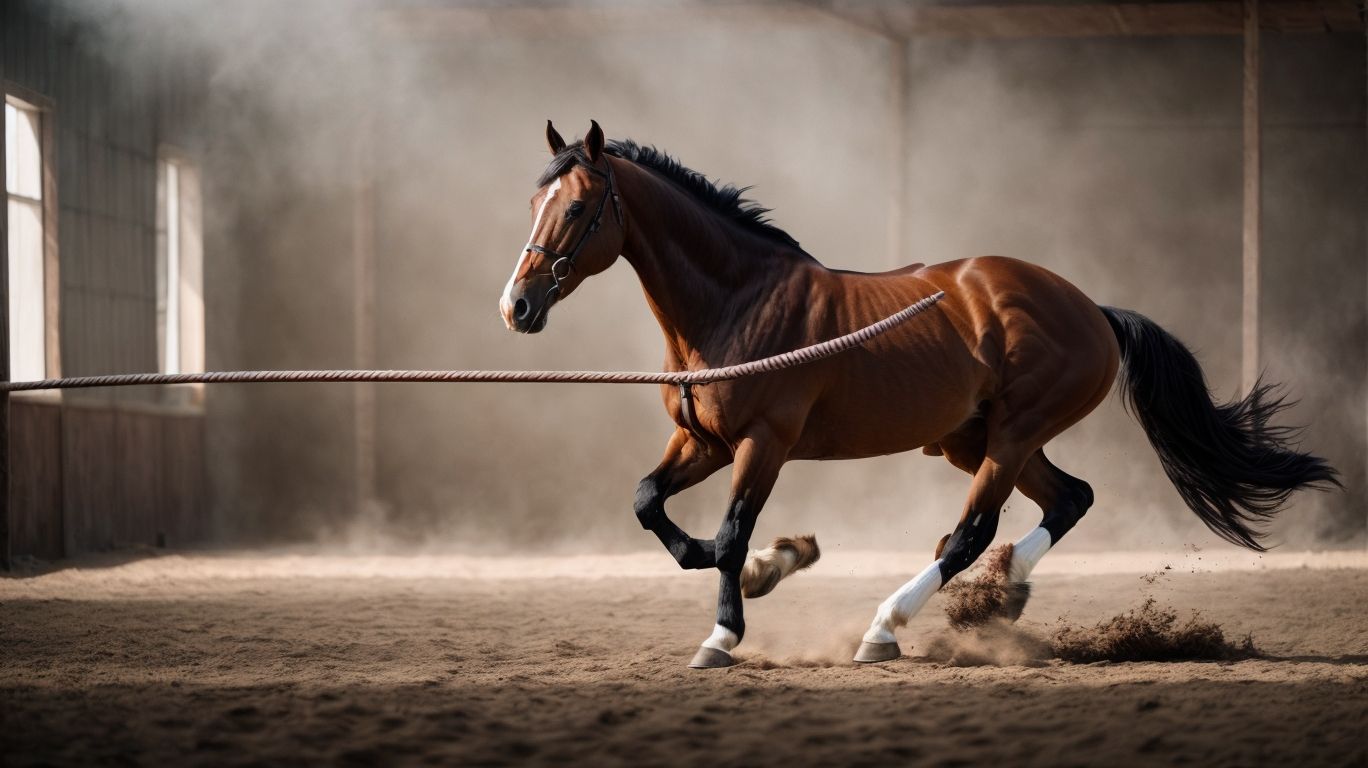
One essential aspect of horse lunging is the use of a lunging line. A lunging line is a long, flexible rope that enables the handler to guide and direct the horse during the lunging session. It serves as a communication tool between the handler and the horse, allowing for precise commands and control.
To set up a lunging area, choosing the right location is key. It should be a flat and level space with good footing to ensure the horse’s safety and comfort. Preparing the ground by removing any obstacles and ensuring adequate traction is also essential. setting up lunging equipment, including a lunge whip and a properly fitted lunging cavesson or halter, is necessary for a successful lunging session.
The process of lunging a horse involves various stages, including warm-up exercises to prepare the horse’s muscles and joints, teaching basic commands such as walk, trot, and canter, and focusing on transitions and circles to improve obedience and responsiveness. It is important to follow a progressive and systematic approach during the lunging session.
To ensure safe and effective lunging, it is crucial to understand horse body language and communicate effectively with the horse using proper lunging techniques. prioritizing handler and horse safety by maintaining a safe distance and using appropriate protective gear is paramount.
Avoiding common mistakes is essential for a successful lunging session. These mistakes include using incorrect lunging line length, which can affect the horse’s balance and movement, improper use of aids and cues, which can confuse the horse, and overworking or underworking the horse, leading to physical or mental fatigue.
By mastering the fundamentals of horse lunging, handlers can enhance their training skills, develop a stronger bond with the horse, and ensure the horse’s physical and mental well-being.
Key takeaway:
- Horse lunging basics: Lunging is an important groundwork exercise for horses that helps with their training and conditioning. It involves the use of a lunging line, a long rope or surcingle that allows the handler to control the horse’s movement.
- Definition and purpose of a lunging line: A lunging line is a long rope or surcingle used to direct the horse’s movement during lunging. It provides the handler with control, allowing them to dictate the horse’s speed, direction, and transitions.
- Tips for safe and effective lunging: Proper understanding of horse body language, using correct lunging techniques, and ensuring horse and handler safety are essential for successful lunging sessions. Awareness of common mistakes such as incorrect line length, improper use of aids, and overworking or underworking the horse is also important.
What is Horse Lunging?
What is Horse Lunging?
Horse lunging is a training technique that involves exercising a horse in a circular pattern around a handler, using a lunge line. This practice is essential for enhancing a horse’s physical and mental well-being. It plays a vital role in developing balance, flexibility, and obedience, and is often employed for warming up or assessing the horse’s movement. During lunging, the handler has the opportunity to observe the horse’s body language and ensure effective training. It also serves as a means for the handler to establish clear communication and teach essential commands, transitions, and circle work. Horse lunging is a valuable tool in both horse training and maintenance, contributing greatly to the overall development of the horse.
Importance of Horse Lunging
Horse lunging is of great importance in the practice of horsemanship as it provides numerous benefits for both the horse and the handler. It helps in developing trust and communication between the horse and the handler, builds muscle strength, improves overall fitness, aids in assessing the horse‘s movement and soundness, allows for controlled exercise and release of energy, teaches the horse respect and obedience, and prepares the horse for riding by warming up and stretching their muscles.
Lunging is particularly crucial for young or inexperienced horses as it helps them gain balance, coordination, and confidence. Additionally, it offers an opportunity for the handler to observe the horse‘s behavior and body language, ensuring their safety and well-being during the training process. The importance of horse lunging should not be underestimated as it plays a vital role in establishing a strong foundation for a horse‘s training and development.
What is a Lunging Line?
A lunging line is an essential tool for horse training, allowing for controlled exercise and communication between the handler and the horse. In this section, we will uncover the ins and outs of a lunging line, exploring its definition, purpose, and the key components that make up this valuable tool. So, saddle up and prepare to delve into the world of lunging lines and the role they play in effective horse lunging.
Definition and Purpose
Horse lunging is a training technique that involves guiding a horse in a circular motion on a lunge line. The purpose of lunging is to exercise and develop the horse’s muscles, improve their balance and coordination, and establish communication between the horse and handler. It is also a great way to assess the horse’s movement and behavior. The lunging line is a long rope or webbing with a snap that allows the handler to control the horse’s movement. Understanding the definition and purpose of lunging is essential for anyone wanting to effectively train and communicate with their horse. Practice lunging in a well-prepared area, using proper techniques, and being attentive to both horse and handler safety for the best results.
Components of a Lunging Line
A lunging line consists of several components that contribute to its functionality and effectiveness, making it an essential tool for horse lunging.
- Lead Clip: The lead clip serves as the connection point between the horse and the lunging line, attaching to the horse’s halter or bridle.
- Lunging Line: This long line, typically made of durable materials like nylon or cotton, provides the necessary length for the horse to move in a circle while lunging.
- Handle: Positioned at the end of the lunging line, the handle allows the handler to maintain a firm grip and control the line during lunging.
- Attachment Loop: The attachment loop is where the lead clip securely connects the lunging line to the horse’s halter or bridle.
- Optional Reinforcement Strap: Some lunging lines include a reinforcement strap or a secondary handle closer to the attachment loop, offering additional support and control.
By understanding the different components of a lunging line, handlers can choose a suitable line that meets their specific needs and ensures safe and effective lunging sessions.
How to Set Up a Lunging Area
Creating the perfect lunging area for your horse can make all the difference in their training. In this section, we’ll dive into the essentials of setting up a lunging area. Discover the key aspects, from choosing the right location to preparing the ground and setting up the necessary lunging equipment. Get ready to create an optimal space for your horse’s lunging exercises and maximize their training potential. Let’s get started!
Choosing the Right Location
When choosing the right location for horse lunging, it is important to consider a few key factors. First and foremost, prioritize selecting an open and spacious area that is free from any obstacles or distractions. It is ideal if the ground is level, well-maintained, and offers good footing in order to prevent any potential injuries. Additionally, it is crucial to ensure that the chosen location is far away from busy roads or any other sources of noise that may startle the horse. It is also important to take into account the availability of shade, as this can provide protection for both the horse and the handler from excessive sun exposure. By carefully selecting the appropriate location, you can create a safe and favorable environment that promotes effective horse lunging.
Preparing the Ground
Preparing the Ground for Horse Lunging
Properly preparing the ground for horse lunging is crucial for the safety and comfort of both the horse and the handler. Here is a step-by-step guide on how to properly prepare the ground for lunging:
- Clear the area: Remove any debris, rocks, or objects that may pose a hazard or discomfort to the horse during lunging.
- Level the ground: Ensure that the ground is as level as possible to prevent any tripping or injuries. Fill in any holes or uneven areas with appropriate materials.
- Smooth the surface: Use a drag or a rake to smooth out the ground surface. This will minimize the risk of injuries caused by uneven footing.
- Provide proper footing: If the ground is too hard, add a layer of sand or footing material to absorb impact and provide better traction. If the ground is too soft, add a layer of compacted dirt or consider using a lunging arena.
- Check for drainage: Ensure that the area has proper drainage to prevent water pooling and creating slippery conditions.
By following these steps, you can create a safe and suitable ground for horse lunging, promoting a productive and comfortable training session.
Setting Up Lunging Equipment
To properly set up lunging equipment for effective communication with a horse, follow these steps:
- Choose a suitable lunging line: Opt for a long, sturdy line made of quality materials to ensure durability when setting up lunging equipment.
- Select a lunging whip or wand: Find a lightweight and easy-to-handle whip that allows for effective communication with the horse.
- Attach the lunging line: Securely fasten one end of the line to the cavesson or bit of the horse’s bridle to establish a connection.
- Hold the excess line: Keep the rest of the line neatly coiled in your non-dominant hand to maintain even tension during the lunging session.
- Hold the whip correctly: Grip the whip at a comfortable and balanced position using your dominant hand for proper control.
- Position yourself and the horse: Stand facing the horse’s shoulder with the whip aimed towards the hindquarters for better communication.
- Adjust the equipment as needed: Ensure that the lunging line is neither too loose nor too tight, and position the whip within reach.
I once made the mistake of setting up the lunging equipment incorrectly by attaching the line too loosely. When I asked my horse to move forward, the line slipped off. Thankfully, he didn’t run off, but this incident taught me the importance of double-checking the equipment before beginning a lunging session.
The Process of Lunging a Horse
Lunging a horse is an essential process in their training, and it involves various aspects that contribute to their overall development. In this section, we will explore the different components of lunging a horse, including warm-up exercises, teaching basic commands, and working on transitions and circles. So saddle up and get ready to embark on a journey through the intricacies of lunging that will help you build a stronger bond with your equine companion.
Warm-up Exercises
- Start with a few minutes of brisk walking to warm up your horse’s muscles.
- Perform trotting exercises to further warm up the muscles and increase heart rate.
- Gradually increase the intensity of the trot by asking for larger strides and engagement of the hindquarters.
- Add in some cantering exercises, starting with short bursts and gradually increasing the duration.
- Incorporate lateral movements such as leg yields or shoulder-in to encourage suppleness and engagement.
- Include transitions between trot and canter and within each gait to improve balance and responsiveness.
- Finish the warm-up with a few minutes of walking to allow your horse to catch its breath and cool down.
Fun Fact: Warm-up exercises are essential for preparing a horse’s mind and body for more intense training sessions, and they help prevent injuries.
Teaching the Basic Commands
Teaching the basic commands during horse lunging is crucial for establishing effective communication and control. Here is a step-by-step guide on how to teach these commands:
- Initiate with the “walk on” command: Employ a verbal cue and gentle pressure with the lunge whip to encourage the horse to commence walking.
- Introduce the “halt” command: Apply gentle pressure on the line while utilizing a verbal cue to prompt the horse to stop. Remember to reward and praise the horse when it responds appropriately.
- Educate the horse on the “change direction” command: Utilize verbal cues and your body language to indicate the desired direction change. Gradually decrease the dependence on the lunge whip or rein aids as the horse becomes more receptive.
- Incorporate the “trot” and “canter” commands: Transition from the walk to the trot or the canter by increasing your energy level and implementing verbal cues. Reinforce these commands with appropriate aids and impeccable timing.
- Practice smooth transitions between commands: Repeat the basic commands in various combinations, facilitating seamless transitions between each gait and direction.
Working on Transitions and Circles
Working on transitions and circles is an important aspect of lunging a horse. Here are the steps to follow:
-
Start with a warm-up: Begin by walking the horse in a relaxed manner to warm up their muscles.
-
Establish basic commands: Teach the horse verbal cues for walk, trot, and canter to ensure clear communication.
-
Focus on transitions: Start by practicing smooth transitions between the different gaits. Gradually work on improving the horse’s responsiveness.
-
Add circles: Incorporate circles of various sizes into the lunging session. This helps improve balance, suppleness, and flexibility.
-
Vary the direction: Switch directions regularly to ensure the horse is working evenly on both sides of their body.
-
Use ground poles or cones: Set up ground poles or cones on the circle to encourage the horse to engage their hindquarters and improve their rhythm.
-
Monitor body language: Pay attention to the horse’s body language to ensure they are comfortable and not showing signs of fatigue or stress.
-
End with a cool-down: Finish the session with a few minutes of walking to allow the horse to relax and recover.
Tips for Safe and Effective Lunging
Lunging your horse can be an incredible training tool, but it’s crucial to approach it with safety and effectiveness in mind. In this section, we’ll dive into some valuable tips that will help you master the art of lunging. From understanding subtle horse body language to utilizing proper lunging techniques, we’ll explore ways to ensure a productive and safe lunging experience for both you and your horse. So saddle up and get ready to enhance your lunging skills!
Understanding Horse Body Language
Understanding horse body language is essential when lunging a horse as it allows you to effectively communicate with them and ensure a safe and successful session. It’s crucial to pay close attention to their signals. Here are some tips to help you understand horse body language:
1. Ears: The position of a horse’s ears can provide valuable insight into their mood and focus. When the ears are forward and alert, it indicates attentiveness. Conversely, if the horse’s ears are pinned back, it may suggest irritation or aggression.
2. Eyes: By observing the horse’s eyes, you can determine their emotional state. Soft and relaxed eyes indicate a calm and content horse. On the other hand, wide eyes and a tense expression may signify fear or stress.
3. Tail: The movement and position of a horse’s tail can give you a clue about their level of relaxation. A relaxed horse typically has a softly swishing tail. Conversely, a raised or vigorously swishing tail may indicate agitation or discomfort.
4. Body posture: Take note of your horse’s overall body posture. A relaxed horse will have a lowered head, rounded back, and loose muscles. However, tension in the neck, back, or hindquarters can be a sign of discomfort or anxiety.
By understanding these signals, you can better meet your horse’s needs and create a positive lunging experience for both of you.
Using Proper Lunging Techniques
Using proper lunging techniques is essential for the safety and effectiveness of horse lunging. Here are some steps to ensure correct technique:
- Position yourself correctly: Stand at a safe distance from the horse and hold the lunging line with a relaxed grip.
- Start with a clear command: Use a verbal cue or a whip motion to signal the horse to move forward.
- Maintain a consistent and steady pace: The horse should move in a rhythmical and balanced manner.
- Avoid excessive pressure: Use gentle, gradual cues to guide the horse and avoid pulling or jerking on the lunging line.
- Change direction correctly: When changing direction, give the horse a clear signal and allow it to transition smoothly.
- Monitor the horse’s body language: Pay attention to the horse’s behavior and adjust your technique accordingly.
- End on a positive note: Finish the lunging session with a calming exercise or reward the horse to reinforce good behavior.
It’s important to remember that horses have different temperaments and may respond differently to lunging techniques. Always be adaptable and responsive to your horse’s needs and cues.
The practice of lunging horses dates back centuries, originating as a training method for cavalry horses. It has evolved over time to become a fundamental technique for developing a horse’s balance, athleticism, ability, and obedience. Today, using proper lunging techniques is an essential part of horse training and conditioning programs, promoting physical and mental well-being for these magnificent animals.
Ensuring Horse and Handler Safety
Ensuring the safety of the horse and handler is crucial during the lunging process. Here are some steps to follow:
- Proper Equipment: Use a properly fitting lunging cavesson or bridle and a well-functioning lunging line.
- Clear Area: Choose a spacious and unobstructed area for lunging, free from any hazards or distractions.
- Secure Footing: Ensure that the ground is level, non-slippery, and free from rocks or debris that may cause accidents.
- Correct Distance: Maintain a safe distance between the handler and the horse to prevent any accidental collisions.
- Body Language: Observe the horse’s body language for any signs of discomfort, stress, or aggression, and respond accordingly.
- Communication: Develop clear and consistent verbal and physical cues to effectively communicate with the horse during lunging.
- Safety Gear: Always wear appropriate safety gear, including a helmet and sturdy footwear, to protect yourself from potential accidents.
Ensuring Horse and Handler Safety is essential throughout the lunging process. Here are a few guidelines to ensure horse and handler safety:
- Proper Equipment: It is essential to use a properly fitting lunging cavesson or bridle and a well-functioning lunging line.
- Clear Area: Choose a spacious and unobstructed area for lunging, free from any hazards or distractions.
- Secure Footing: Prioritize level ground that is non-slippery and free from rocks or debris to avoid accidents.
- Correct Distance: Maintain a safe distance between the handler and the horse to prevent any accidental collisions.
- Body Language: Be attentive to the horse’s body language, looking out for any signs of discomfort, stress, or aggression, and respond accordingly.
- Communication: Establish clear and consistent verbal and physical cues for effective communication during lunging.
- Safety Gear: It is crucial to wear appropriate safety gear like a helmet and sturdy footwear for protection against potential accidents.
Common Mistakes to Avoid
Avoiding common mistakes is crucial when it comes to horse lunging. In this section, we’ll uncover a few key issues to watch out for. From improper use of aids and cues to incorrect lunging line length, we’ll explore these pitfalls that can hinder your horse’s progress. We’ll also touch on the importance of finding the right balance in your horse’s exercise routine, avoiding both overworking and underworking. Let’s dive in and ensure a successful lunging session for you and your equine partner!
Incorrect Lunging Line Length
The correct length of a lunging line is crucial for safe and effective lunging sessions with a horse. Incorporating an incorrect lunging line length can result in accidents and impede the horse’s training progress.
To avoid this mistake, follow these steps:
1. Select the appropriate length based on the horse’s size and the desired exercise. Typically, a lunging line should be around 25-30 feet long.
2. Refrain from using a line that is too short, as it can restrict the horse’s movement and cause tension.
3. Likewise, avoid using a line that is too long, as it can become tangled or increase the risk of the horse stepping on it.
4. Regularly evaluate and adjust the line length during the lunging session to accommodate the horse’s movement.
By ensuring the correct lunging line length, you can enhance the horse’s training experience and maintain a secure environment.
Improper Use of Aids and Cues
Using aids and cues correctly is crucial when lunging a horse to ensure effective communication and prevent confusion or discomfort. Avoiding improper use of aids and cues is essential for a positive training experience. Here are some steps to follow:
- Start with proper training: Before attempting to lunge a horse, make sure you have a solid understanding of the basics of lunging and the proper use of aids and cues. This will help you avoid any improper use.
- Be consistent: Consistency is key when it comes to communicating with your horse. Use clear and consistent aids and cues to help the horse understand what you are asking for. This will prevent any confusion.
- Avoid harsh or excessive aids: It is important to use gentle and light aids when communicating with the horse. Harsh or abrupt movements can cause unnecessary stress or discomfort.
- Timing is everything: Timing plays a crucial role in giving aids and cues. Make sure to apply aids at the right moment to reinforce desired behaviors and avoid any confusion.
- Observe the horse’s response: Pay close attention to how the horse reacts and responds to your aids and cues. If necessary, adjust your technique to better communicate with the horse.
- Seek professional guidance: If you are uncertain about the proper use of aids and cues, it is advisable to seek guidance from a professional trainer or instructor. They can ensure that you are using them correctly.
By following these steps, you can effectively use aids and cues while lunging a horse, promoting clear communication and a positive training experience.
Overworking or Underworking the Horse
Overworking or underworking a horse during lunging can have negative effects on its physical and mental well-being. It is important to find the right balance and understand the horse’s individual needs. Here are some key considerations to avoid overworking or underworking the horse:
1. Time and intensity: Gradually increase the duration and intensity of the lunging sessions to prevent overworking the horse. Introduce breaks and variation to prevent boredom and underworking.
2. Fitness level: Tailor the lunging exercises based on the horse’s fitness level. Avoid excessive strain that can lead to fatigue or injury, both from overworking or underworking.
3. Mental stimulation: Incorporate different exercises, transitions, and obstacles to keep the horse engaged mentally, preventing both overworking and underworking.
4. Observation and feedback: Watch for signs of fatigue or disinterest, and adjust the workout accordingly to avoid overworking or underworking the horse. Pay attention to the horse’s body language and respond to its needs.
5. Professional guidance: Consult with a qualified trainer or instructor who can provide guidance on proper lunging techniques and help create a balanced training program for the horse, preventing both overworking and underworking.
True story: I once knew a horse named Bella who was overworked by her owner. She was continuously lunged for hours without breaks, resulting in exhaustion and physical issues. After seeking advice from a trainer, the owner learned to balance Bella’s workouts, providing her with ample rest and variety. As a result, Bella became healthier, happier, and more willing to cooperate during lunging sessions.
Some Facts About Horse Lunging Basics – Lunging Line:
- ✅ Lungeing is a training method where a horse moves in a circle around the handler, attached by a long lead rein called a lunge line. (Source: Our Team)
- ✅ Lungeing can be done in all gaits and both directions, providing a versatile training exercise for horses. (Source: Our Team)
- ✅ Lungeing benefits include improving cardiovascular fitness, developing strength and muscle, settling an energetic horse before riding, and training young horses. (Source: Our Team)
- ✅ Lungeing adds variation to exercise, improves suppleness and obedience, helps with balance, and strengthens the bond between horse and handler. (Source: Our Team)
- ✅ Lungeing can be used in the rehabilitation of certain injuries but should be done under the consultation and guidance of a vet. (Source: Our Team)
Frequently Asked Questions
FAQs about Horse Lunging Basics – Lunging Line
1. Can lungeing help improve my horse’s cardiovascular fitness and strengthen its muscles?
Yes, lungeing is an effective training method that can improve cardiovascular fitness and develop strength and muscle in horses.
2. How can lungeing benefit young horses and help settle an energetic horse before riding?
Lungeing is a valuable tool for training young horses and can help settle an energetic horse before riding by providing a controlled exercise and training environment.
3. Is it important to consult a vet before using lungeing for horse rehabilitation?
Yes, it is crucial to consult a veterinarian before using lungeing as a rehabilitation method for certain injuries, such as collateral ligament injuries.
4. What equipment do I need for safe lungeing?
For safe lungeing, you will need a lunge line, lunge whip, bridle or cavesson to attach the lunge line to, and additional equipment such as a saddle or surcingle if desired.
5. How should I attach the lunge line to the horse’s bridle?
There are two recommended methods for attaching the lunge line to the bridle. You can either run the line through the inside ring of the bit and clip it to the outside ring, or run the line through the inside ring, loop it around the bottom of the inside ring, and then clip it to the outside ring.
6. What precautions should I take during lungeing to reduce the risk of injury?
To reduce the risk of injury, ensure the horse’s tack is correctly fitted, use protective boots if necessary, lunge in a fenced enclosure or quiet place, and follow expert advice on technique and equipment usage.